Saturday, August 28, 2010

Chicken tortilla soup... as promised by the scrumptious picture.

Ok so this is gonna be quick because it is delicious and I should share the recipe with everyone. But I warn you now, once you eat this you will never want to eat any other chicken tortilla soup ever again.
This recipe is for one big pot, but I have not made just one pot of this in ages. So go buy an extra soup pot and make two.

Cut three big fat bright red tomatoes in half an put the in a baking pan. Drizzle them with olive oil and sprinkle with salt and pepper. Put this in a 400 - 450 degree oven. Yes, you are roasting you own tomatoes. No you are not allowed to use canned tomatoes in this soup. If you use canned tomatoes just go ahead and stop following my blog right now. I think I have already done this rant so I will spare you. Just roast your own tomatoes, it's really easy, really healthy and really cheap. Go to the canned tomato section of your grocer and throw all the cans on the floor, take a picture of yourself doing this and send it to me. That would make me smile.

Here is your prep to make putting it all together easy. Chop up 2-3 yellow squash, 2 zucchinis, 1 big onion, one stalk of celery and the green parts of a few green onion. Check you tomatoes, if they are wrinkly and cooked pull em out and let them sit out to cool so that you can handle them. Put a chopped onion into the bottom of your soup pot with some olive oil and heat until the onions brown a bit. Add two boxes of vegetable or chicken broth to the pot. Take 2 chipotle peppers in adobo sauce out of the can and slice em up. If you have never used chipotle peppers in adobo sauce you can find it in a little can in the "International" section of your grocery. Cut the kernels off one ear of corn and set aside.

Once your tomatoes are cooled enough to handle the skins should slide ride off. You can discard these, but I throw them into a blender with a little water and then just liquify it and add it to the soup. Waste not, want not. Use your hands to mash up the tomatoes into the pot. Do this slowly and well. Take your time. Squeezing cooked tomatoes between your fingers might be one of the most fun things to do ever.

Put the sliced chipotle peppers into the pot and if it is boiling throw in your chicken. I use two boneless, skinless breasts and 4 boneless, skinless thighs. Do not cut them up, just toss them in whole. While you let this boil for a while take your corn and put it in a little pan with a little oil and start to cook it. You are kind of pan roasting the corn kernels to get tossed on top of the soup when you serve it.

Take a break, drink some wine, let the chicken burl.

Now take your drunk butt back and add the squash and zucchini. Pull out the chicken with tongs and rough chop. It should kind of fall apart a bit as you're cutting it up. Bite size pieces ppl, bite size. Return chicken to the soup. Add celery to the soup.

If you can find Menudo seasoning in the spice section at your grocery, stock up on it. If you can't get a bag of taco seasoning. At this point you will either be adding the taco seasoning, about 2/3 of the bag, or menudo seasoning, about two heaping spoonfuls. Also add a good heaping spoonful of cumin and two spoons of the adobo sauce from the can the peppers came out of.

Slice up an avocado and break out some sour cream. Slice two limes and juice them into the soup. Your soup should have been simmering to low boiling the whole time. Taste the broth, please blow on it first, I don't need a lawsuit from some crazy person who drank boiling soup. You may need to add salt at this point. Really the only way you wouldn't need to add salt is if you used the saltiest broth EVER and a bag of taco seasoning that used MSG. Yup, that's right. MSG is still in nearly everything. Read your labels. Add sea salt and cracked black pepper until the soup is uber delicious. Turn the heat off.

Take some corn tortillas and slice them into 1 inch slices. Toss these in a little oil and lots of salt and pepper. Put them on a cookie sheet or foil and bake them in a 375 degree oven for just a few minutes until they get crispy. Keep a close eye on them because it is way easier to burn these than to get them right.
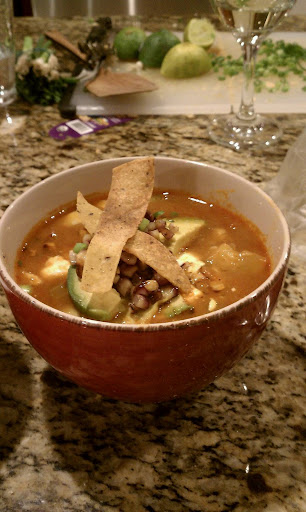
Presentation...

Big bowl of soup
Top with big dollup of sour cream. Do a dollup, do do a dollup.
Sprinkle with the roasted corn
Top with sliced avocado
Sprinkle sliced green onion around the edge
Top with tortilla strips

This soup is my crowning jewel. I love it and so does everyone who tries it. Just try it, you will never look back.

Again, pardon the typos. I promise to come back and edit them out later. Much love and check out the delicious pics.

Friday, August 20, 2010

Chicken tortilla soup

Family approved. Pork Tenderloin and this recipe will be up tomorrow :-)
Published with Blogger-droid v1.5.4

Wednesday, August 18, 2010

let's see if my new Blogger app works

hey!
Published with Blogger-droid v1.5.3.1

Monkeys like pork, at least the monkeys that live in my house do...

Hey Hey Hey! Do you have monkeys to feed? No? Well, you should. Because there are starving monkeys out there and you should be doing your part to help. Here is how you can.

Fuji Apple Jalapeño Marinated Pork Tenderloin with Caramelized Spanish Onion, Caprese Orzo and Soy Brussels Sprouts. Monkeys loooooove brussels sprouts.


See!

Well, here is the how to help. Chop up a big ole spanish onion, I used a red one, you can use an neon orange one for all I care, just pick the coolest looking onion in the grocery. And if you have never examined all the onions to find which one is coolest than grocery shopping with you is no fun. If you ever see anything in the produce aisle that just looks cool, buy it. You buy your clothes because they look cool, why are you so dull when it comes to food? Take your super cool onion and slice it up. Toss it into a pan on medium heat with a decent amount of olive oil, add salt and pepper. This pan will sit on medium heat for the entire time, onions take a long time to caramelize properly. You are not trying to burn them or make them crispy, you are trying to slow cook them and make them mushy and yummy. You will be periodically adding liquid to this pan to keep them soft. I go between water and apple juice, but you can use whatever liquid you like. Just don't let the pan get dry. You add enough liquid to just cover the bottom of the pan and let it boil off slowly. Be patient this does not happen quickly. As you get used to doing this you may become more like me, I am constantly adding different amounts of liquids, adjusting the heat so that the liquids concentrate faster or slower. I will get impatient, add a little too much liquid, turn the heat up high to boil it off, then turn it down super low and let the pan dry out to get more caramelization and repeat. There is not much method to the madness.

In the Apple Juice post I talk about the marinade for the pork tenderloin, now that the pork has sat overnight you can dump the entire pork tenderloin and the marinade into a small baking dish. Small is better because it keeps the moisture level high on the tenderloin. Everyone (and by everyone I most certainly mean you) has eaten dry, over cooked pork. It is impossible to over cook the pork in this recipe, IMPOSSIBLE. Put this tenderloin bathing in marinade into a 350 degree oven.

Put a pot of water to boil for your orzo, or whatever kind of rice shaped pasta you got. Salt this water heavily. While this water is coming to a boil slice up some cherry tomatoes and pull out some shredded Asiago cheese. You can use whatever cheese you like. You can shred your own or buy it shredded. But I don't recommend parm for this one, it is too salty and strong. Something milder. Manchego would be good as well. Once your water boils, cook your orzo, drain it and toss it with the tomatoes and cheese. There are not even rough amounts in this part of the recipe because you should just use whatever you like. If you are a tomato fiend do a ton of tomato. If you are on a diet use less cheese. It's whatever you like. Once you toss this just leave it out in the bowl and let it get to room temperature.

Once you have set aside your orzo you can start the brussels sprouts. Don't try to overlap this task because you needed that 20 minutes to go by so that the tenderloin can cook. Take your brussels sprouts and slice them in half. Toss them into a big pan, not pot, and put about a centimeter of water in there. Turn the heat up to high and wait for this baby to boil. If you have a lid big enough cover this bad boy and it takes half the time. These brussels sprouts are steaming in the water, so after a couple minutes once they start boiling take a spoon and toss them around to make sure the steam evenly on all sides. As the water starts to boil out and the pan dries up check one of the sprouts and see if it is close to done. If they are almost the way you like them then good for you, if they are still hard add more water and let them keep steaming until they are almost perfect. Add water a little at a time because for the last step you want the pan to be almost dry. Once you think they are done and the pan is dry toss in a couple spoonfulls or big splashes of soy sauce. Toss all the sprouts around and the soy sauce will sponge up into all the little interior layers and then start to caramelize as it cooks. YUM! These are so good I usually make way way way too many in hopes of saving them and then they all get eaten.

So, turn your sprout heat off and lid the pan so that they stay warm. Hopefully you have been attentive to your onions this whole time even though I haven't reminded you. I mean come on! You're a bid kid now, do I really have to remind you to do everything?? Oh yeah, don't forget about your tenderloin. Your onions should be cooked down by now and you can scoot them over to one side of the pan.

All eyes turn to the tenderloin. Pull it out of the oven and set it down. If you got a tiny tenderloin then it is done now, if you got a beefed up hormone injected tenderloin than there is an extra step. Let the meat sit for 5-10 minutes, and pour the liquid into the pan with the onions, kick the heat up a notch. Either way, after the meat sits for 5-10 minutes you can now slice your tenderloin into medallions. If the meat is slightly pinkish in the center of your slices it is cooked perfectly... this will be the smaller tenderloins. If it is very pink and raw looking throughout the center you got a big momma and you will need to toss your slices into the pan with the cooking liquid and onions for a hot second. This is really easy, all you do is through the slices in and cook them for 1 minute on each side. Either method leads to perfectly cooked, juicy pork.

To plate the pork lay it on the plate drizzle some of the reduced marinade over it with a spoon and top that with caramelized onion. Plate up your sprouts and your orzo and tah dah! Dinner for all your monkeys.

Please excuse all typos, it has been so long since i posted that i just want to through this up there.

Tuesday, August 17, 2010

Fuji Apple Jalapeño Pork Tenderloin with Caramelized Spanish Onion, Caprese Orzo and Soy Brussel Sprouts... recipe/shananigans to follow

Homemade Apple Juice & Pork Tenderloin

I accidentally made homemade apple juice yesterday and it was the most genius thing I have ever done. I had bought a bunch of fruit to blend up and put in Syd's new super fantastic rocket-pop molds. The bag of organic Fuji apples was a steal at $5 so I went for it. Now, as you may or may not know, you really don't need much liquid to make a popsicle. So, after I had made 3 different fruit concoctions I was left with about 5 apples. I was also left with raspberries and pineapple, but I will eat those. Oddly, the idea of just eating an apple is not one that I am too fond of. I love the flavor of apple, but I never just eat them whole. Realistically, these 5 apples were going to sit in my fridge until they became brown, mushy and altogether vile.

I threw caution to the wind and chopped them up, threw them in the blender with some water and voila... apple juice. I left the blender on for a good while to liquefy it and added even more water during the process. When I poured it into a glass it tasted like watery apple juice. But i thought to myself great! less sugar and more water for Syd. But then something magical happened, this fabulous juice sat in my fridge for an hour or so. Amazingly it oxidized into that fabulous dark brown color of real apple juice and got significantly sweeter. It is SOOOOOO freakin' yummy, it should be illegal for me to post this.

Even Mr. Chris said it was good, and he likes to mock my organic eating, home made fruit juice making butt, but even he was convinced on this one. I will tell yall one thing, for me to convince him that organic or homemade is better, I usually also have to make it cheaper too. So if you are reading this thinking that I'm some crunchy momma who has money to burn on fancy ingredients and overpriced organic non-sense you are way past wrong. The trick to it all is less ingredients and less steps. The closer it is to its original state the better and the more affordable. Also, knowing when organic makes a difference and when it doesn't. My one biggest thing is dairy. Please, all 13 people who read this, switch to organic dairy. All that means is milk, cheese and butter. You won't break the bank, but you will benefit greatly. All toxins and medications (the hormones & antibiotics that they give cows) are stored in the fat cells. The same fat cells they make your butter, milk and cheese from. You can get organic butter, milk and cheese in nearly every grocery store these days. It's one tiny change, don't fight it.

Ok, and for all those people that I totally freaked out by my orange cheese rant, I have good news. If you look on the back of your cheese packaging and the coloring ingredient is annatto, then you are safe. Annatto is an all natural coloring made from the pulp around the seed of the achiote plant. If you do not see annatto it is artificially colored, period. Sorry for not including this is the original post, wink wink.

Any who, so what did I do with all this fantastic apple juice you ask. I let little Miss Sydney drink it and I marinate my pork tenderloin in it. Pork tenderloin marinade goes a little like this. Pork tenderloin goes into zip lock bag, then pour enough apple juice in to cover it. Grate 3 garlic cloves into the bag and one half a jalapeño, or a whole jalapeño if you are feeling saucy! Ole! Cracked black pepper, a splash of olive oil and a splash of vinegar go in that baby as well. Get all the air out and then zip it up and fridge it. Put it in a bowl in case later that night you are sleep walking with a toothpick and you accidentally poke a hole in the bag. Now you feel like a genius because all that raw pork marinade is in the bowl and not all over your fridge. You genius sleepwalker you. Yes I marinated mine over night, but if you only have 30 minutes that is ok too.

Now if you want the rest of the pork tenderloin recipe you gotta read the next post, because I still have to go home and make that bad boy. I just marinated him last night. Twenty bucks says my apple juice will be even better today than it was yesterday. Sweeeeet!

Wednesday, August 4, 2010

My personal favorite - My own "Tuna Noodle Casserole" - Herein lies the Orange Cheese Rant

I could honestly eat this every single day, but I just don't eat that much tuna.

Bow-tie pasta. If you are one of those unfortunate souls that chooses to continue to read my crazy blog you will eventually find out that I am a stickler for many things, random things, not things that make any kind of sense to anyone else. I do not follow recipes, I do not care if you put 8 or 10 eggs in your dish, I do not believe the hype about measuring everything to a T just because you are baking it. I do not own measuring spoons, that's right no measuring spoons for me. I had a set of porcelain ones that were given to me as a gift, broke 'em (I mean come on, porcelain?) and never replaced them. If you use milk instead of heavy cream so be it. Salted butter instead of sweet butter, whatever! So if there is something that I do become crazy about, you gotta cut me a little slack.

Bow-tie pasta. This dish actually tastes better with bow-tie pasta than with any other pasta. Just trust me. Or don't trust me, make it seven times, feed it to your friends in a blind taste test and then come back and tell me which one won. Or don't tell me, I already know. Bow-tie pasta.

Boil your bow-tie pasta in salty water. How salty you ask? Add what amount of salt you feel is appropriate and then double it, that is how salty. While your water is coming to a boil/pasta is cooking here is the list of what you need to prepare.

Shred a bunch of cheddar cheese. Here is my pontification on cheddar cheese. Do you know that America is one of the few places with orange cheddar cheese? It is not because our fancy American cows have orange milk though. It is because we dye our cheese. Yup, that's right, we dye it. Why? No good reason. In fact the dye is bad for you, it causes inflammation in the connective tissues in your body. Kraft uses Yellow #5, as do many other companies. Oh wait, let me correct myself, they took out yellow #5 in all products shipping to Europe or Australia because their governments/markets demanded it. Can I put this into perspective for a moment? BP, the now infamous oil company, did not employ safety measures that it uses offshore all over Europe in the Gulf. Were these measures mandatory offshore in Europe? Nope, they just did it out of the kindness of their hearts. But here in the good ole US of A, no extra safety measures, just catastrophic oil spills. Would those safety measures have stopped this spill? Who knows? Maybe, maybe not. Still kind of a stab in the back a little though. So does yellow #5 give your kid autism, ADHD, arthritis? Who knows? But at least it's not giving it to kids in Europe and Australia, thank god!

Kay, I'm done.

So shred up some cheddar cheese. If you use orange at least use organic so that natural dyes are being used.

Here is the hilarious part. Open up a can of tuna. Why on earth would a girl that goes psycho about orange cheese and yellow #5 tell you to open up a mercury ridden can of tuna? I pick and choose my battles. I eat cheese WAY more than I eat tuna, so it matters more. Drain your tuna and set aside.

Pull out some milk and butter. Ummm... maybe two big hunks of butter. I was gonna say pats of butter, but go big. As for the milk, somewhere between a short glass and a tall glass. Pull out some frozen peas. You can also use frozen edamame, yum.

Once your noodles have been cooking for a bit but are still kinda tough throw in the peas. Cook your noodles to al dente aka you still have to use your teeth to chew them. Drain you pasta pea mixture. Best way to do this: Suit up with oven mits, put the lid on the pot and hold it in place while you tilt the pot over in the sink. You may lose a noodle, but you won't have to wash a colander. Return pot to stove, put on low heat, add butter and milk. Stir until melted. Add tons of cheese and tuna. Stir it up till everything is melty and sticky. Add a ton of cracked black pepper, a tiny bit of salt to taste and whatever else you can come up with.

Some additions that I use if I have them:
Parm cheese - careful of the saltiness when you do this.
Sour cream
Yogurt
Different veggies - just make sure you time it right so they can cook all the way in the water
Shredded chicken instead of tuna
Other types of cheese
halved cherry tomatoes

Serve it up! This seriously should not take you more than 15 minutes. If it does, let me know and I will come over and fix you.

Kisses!

Just sharing some old food pics

Here are some food pics of things I have done in the past. It is not food from this blog, because I honestly don't have my kick ass friend Paula stalking me with a camera. All of these dishes were self-invented by yours truly, no recipes involved. It would be a major work of mental strength to try and remember how I did some of these recipes, but maybe if I get some free time one day (ha!) I will be able to recreate them on this blog.

I promise to try to remember to take photos of what I cook. I will put my camera in the kitchen. Just got to save up some money for ingredients these days. :-) Seriously, if anyone wants me to cook for them you can pay me in extra ingredients that I can take home with me!


Fruit tart as served, whole tart is pictured below.


Spiraled zucchini about to get sauced, ow ow!


Plum and Heirloom tomato salad, so simple and so amazingly perfect.


Homemade pumpkin ravioli with crispy shallots and brown butter sage sauce. Side salad with roasted beats and fresh goat cheese. Kind of looks like a hot mess, but tastes sooo yummy.


Chocolate soufflé with raspberry and fresh whipped cream

Homemade lobster ravioli with shallot and leak over asparagus puree with shaved white cheddar (the only cheddar worth eating).


Fresh fruit tart, mmmm... this is so good and so simple


Baked halibut, over thai-peanut zucchini "noodles" and coconut forbidden rice. :-)


Fresh calamari, battered in almond flour and pan seared with asian dipping sauce. Gluten free baby!


Tuesday, August 3, 2010

Tuna noodle casserole

Everyone hates tuna noodle casserole. I have a stovetop version that is delicious. I'm not even lying, delicious. Takes like 15 minutes to make, mmmmm....

You will just have to wait.

Green Eggs and Ham

This is one is awesome!!! I discovered this on accident.

Hard boil some eggs. If you don't know how to hard boil an egg, don't worry, you are not alone. Here it is... put enough water in a pot to cover the eggs, put in the eggs, put on the stove, turn on heat. Simple right? Wait, you aren't done yet. Once the water comes to a rolling boil, continue cooking for 10 minutes. To be completely honest I have never in my life timed the eggs, I wing it every time. I never even test my eggs, I just guess the time and hope for the best. Hasn't failed me yet. Thus, you will be fine, I swear. When you pull them off the stove put the pot in the sink and run cold water over it for a good minute or so to stop the cooking. Just let this sit in the sink in cold water while you do the rest.

Put some frozen peas into a microwave safe dish, add a little water and microwave for 1 minute. Drain the peas and put onto a cutting board. Get a sharp knife, preferably a wide one and chop up the peas as finely as you can. Don't get all stressed out about this, just take your aggression out on the peas. Then chop up some thinly sliced deli ham, I like honey baked, but use whatever you got.

Now the eggs should have cooled. Peel and rough chop em. Toss eggs, peas and ham into a bowl, add a pinch of salt (not much, the ham is already salty) and a big pinch of fresh cracked black pepper. If you like add a tiny squeeze of mayo and mustard, I do this on a case by case basis. If my egg yolks are on the softer side they do the trick for moisture, however if they come out on the dryer side I add mayo and mustard.

Stir all this together and feed to your kids, yourself, your dogs. It is super cool looking and super yummy. This version of green eggs and ham was discovered as an accident of poverty, but I love it to death.